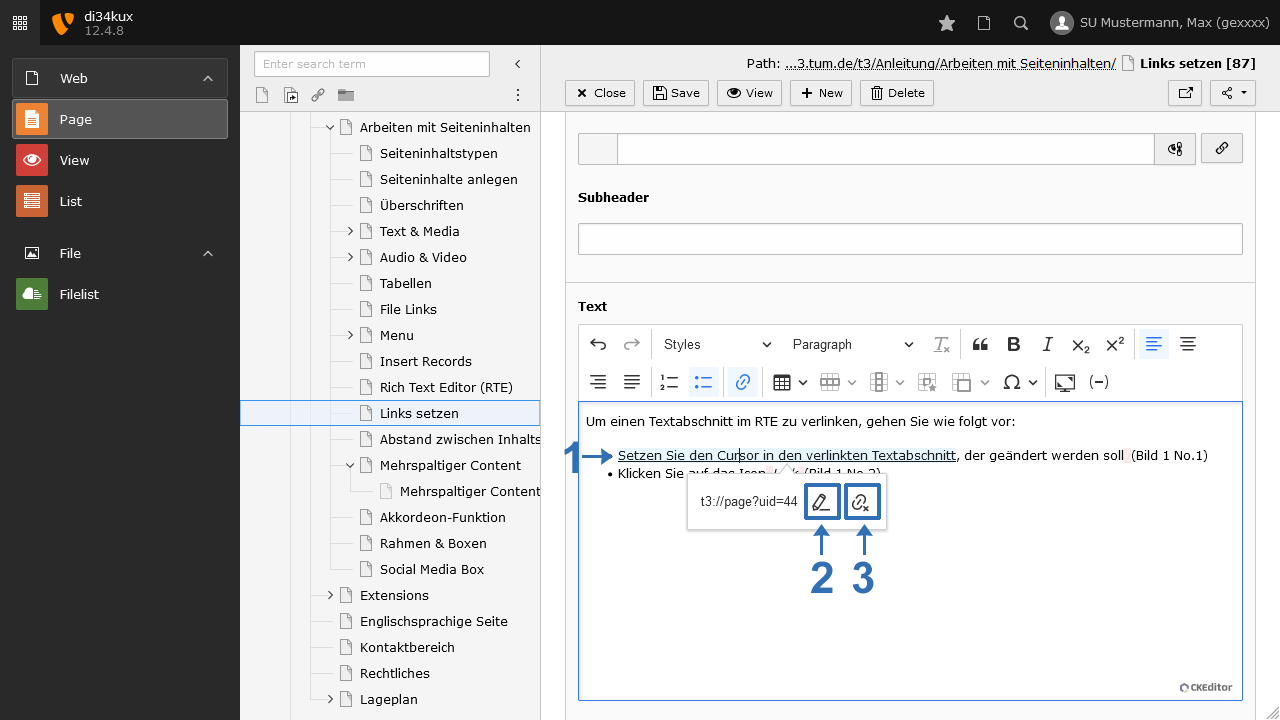
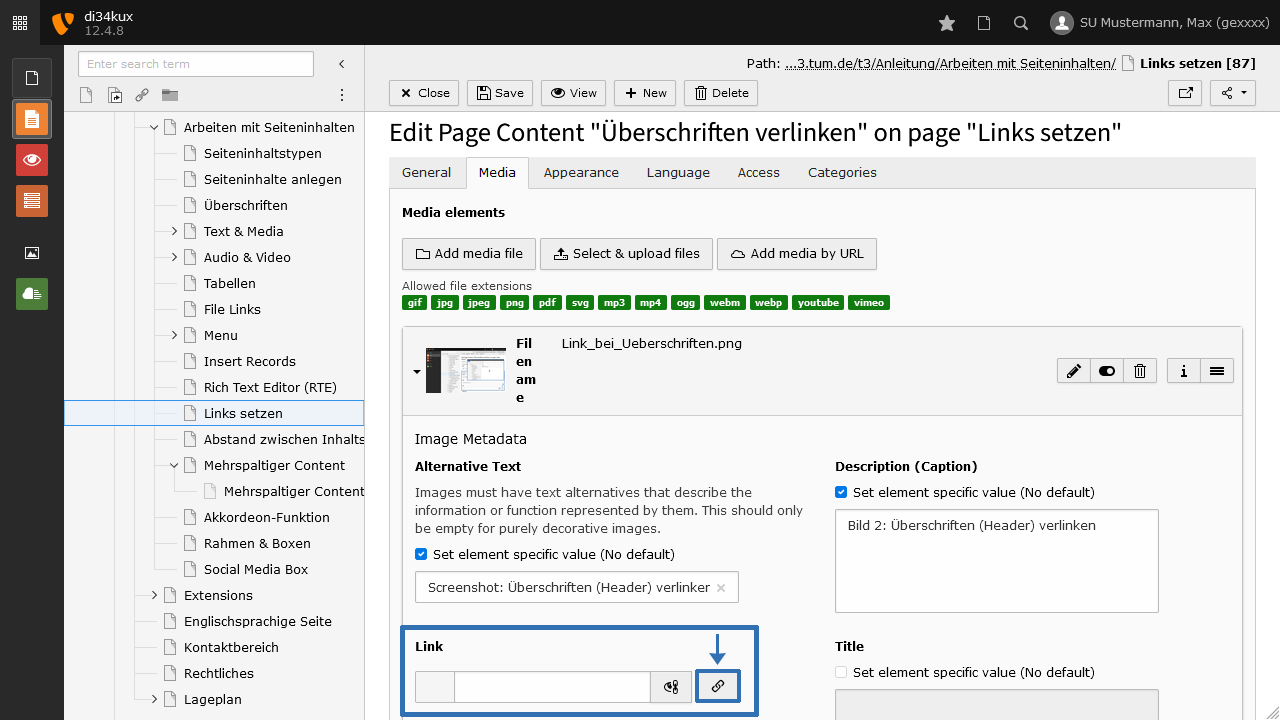
Skip to content
  • Guide TYPO3
  • Login / Account
  • Functions / Extensions
  • Audio / Video
  • Terms of Use
  • FAQs
  • de
  • en
  • Central Information Technology (TYPO3-Team)
  • IT Service Center (ITSZ)
  • Technical University of Munich
Technical University of Munich
  • Home
  • News from TYPO3 Team
  • Webpool
    • Non-faculty institutions
    • TUM School of CIT
    • TUM School of ED
    • TUM School of LS
    • TUM School of MGT
    • TUM School of MH
    • TUM School of NAT
    • TUM School of SOT
    • TUM Graduate School (GS)
    • Integrative Research Institutes (IRI)
    • Technology Core Facilities (TCF)
    • Corporate Research Centers
    • Munich School of Politics and Public Policy
    • TYPO3 Web-Archive
  • Service
    • Offer
    • Terms of use
    • Requirement
  • Documentation
    • TYPO3 basics
      • Terms
      • Module bar
      • Page tree
      • Filelist
      • Recycler
    • User management
      • Registration and login
      • Permission concept
      • Groupdelegation
    • Pages
      • Page types
      • Create a page
      • Visibility
      • Order pages
      • Delete pages
      • Scheduled publishing
      • Page layout
    • Content elements
      • Page content types
      • Create Page content
      • Headers
      • Text & Media
        • Images
        • Image gallery
        • Slideshow
        • Alternative text for images
        • Image cropping
      • Audio & video
        • Embedding audio files
        • Embedding videos
      • Tables
      • File Links
      • Menu
      • Insert records
      • Rich Text Editor (RTE)
      • Adding links
        • Manage anchors
      • Spacing between content elements
      • Multi-column content
      • Accordion Functionality
      • Frames & Boxes
      • Social Media Box
    • Extensions
      • CurlContent
      • TUM MemberList
      • TUMcourses
      • TUMvCard
      • News
      • TUMFIS
      • T3UP Carousel
      • iframe with consent
    • English version
    • Contact area
    • Accessible content
    • Legal matters
    • Maps
      • Maps with Google Maps
      • Maps with BayernAtlas
  • FAQs
  • Contact
  • Sitemap
  1. Home
  2. Documentation
  3. Content elements
  4. Adding links

Adding links

  • Linking headers
  • Linking text
  • Linking images
  • Link to an internal page or directly to a content element
  • Link to a specific section ("anchor")
  • Link to an internal file
  • Link to external websites
  • Link to an email address
  • Link to a password-protected area
  • Changing/deleting links

Linking headers

Screenshot: Linking Headers
Image 1: Linking Headers
  • Click on the icon to the right of the “link” field (Image 1, No.1).
  • The Link browser opens (Image 1, No.2), where you can enter the link address.
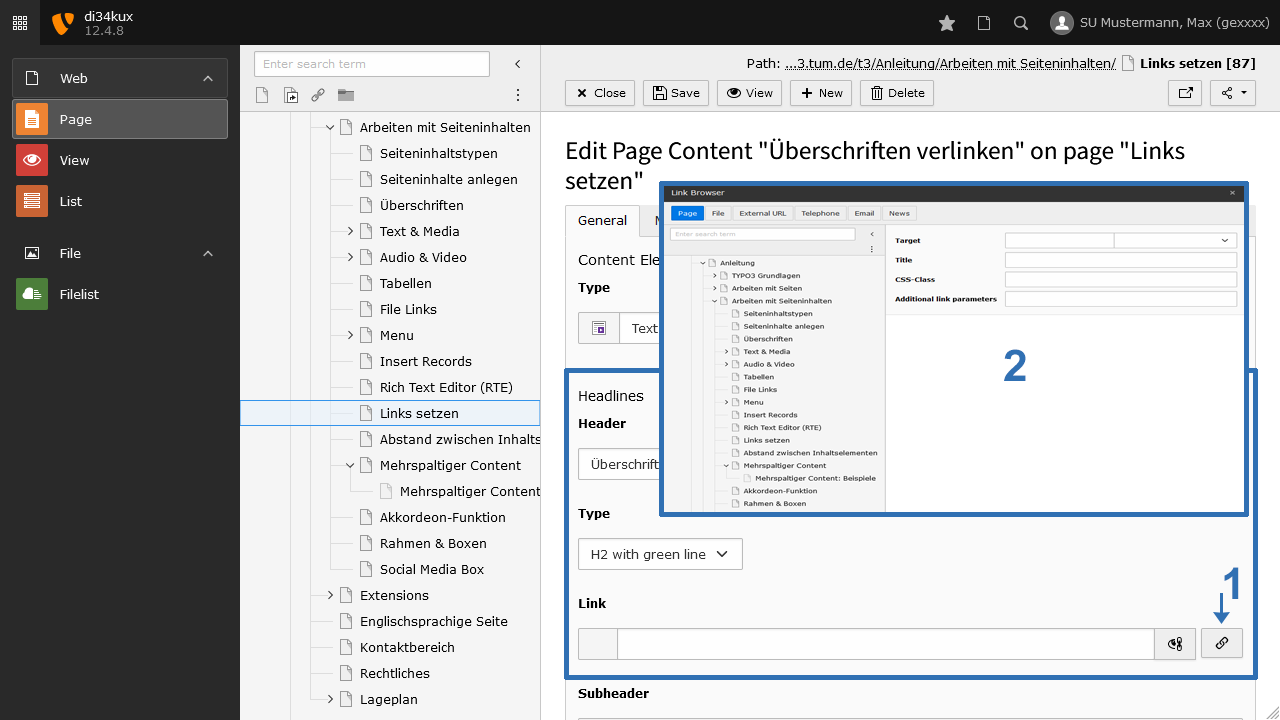
Linking text

Screenshot: "Link" Icon
Image 2: "Link" Icon
Screenshot: Link Browser
Image 3: Link Browser
  • Highlight the text section that you want to link (Image 2, No. 1).
  • Click on the Link icon (Image 2, No. 2).

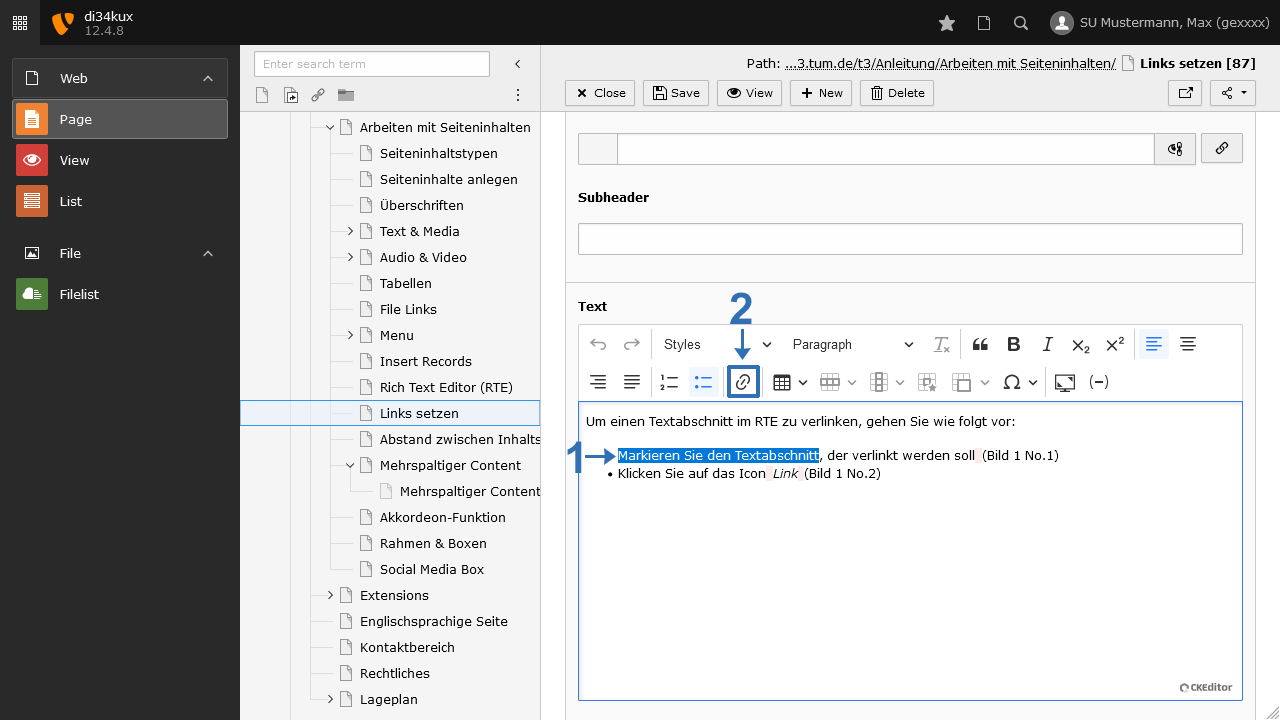
The Link Browser opens (Image 3), where you have the following link options:  

  • Page: for links within your website.
  • File: for links to a file in your file list.  
  • External URL: links to external websites.  
  • Telephone: for linking to phone numbers (e.g. for smartphones).  
  • Email: for linking to email addresses.  
  • News: for linking to news posts (only if the news extension is implemented).
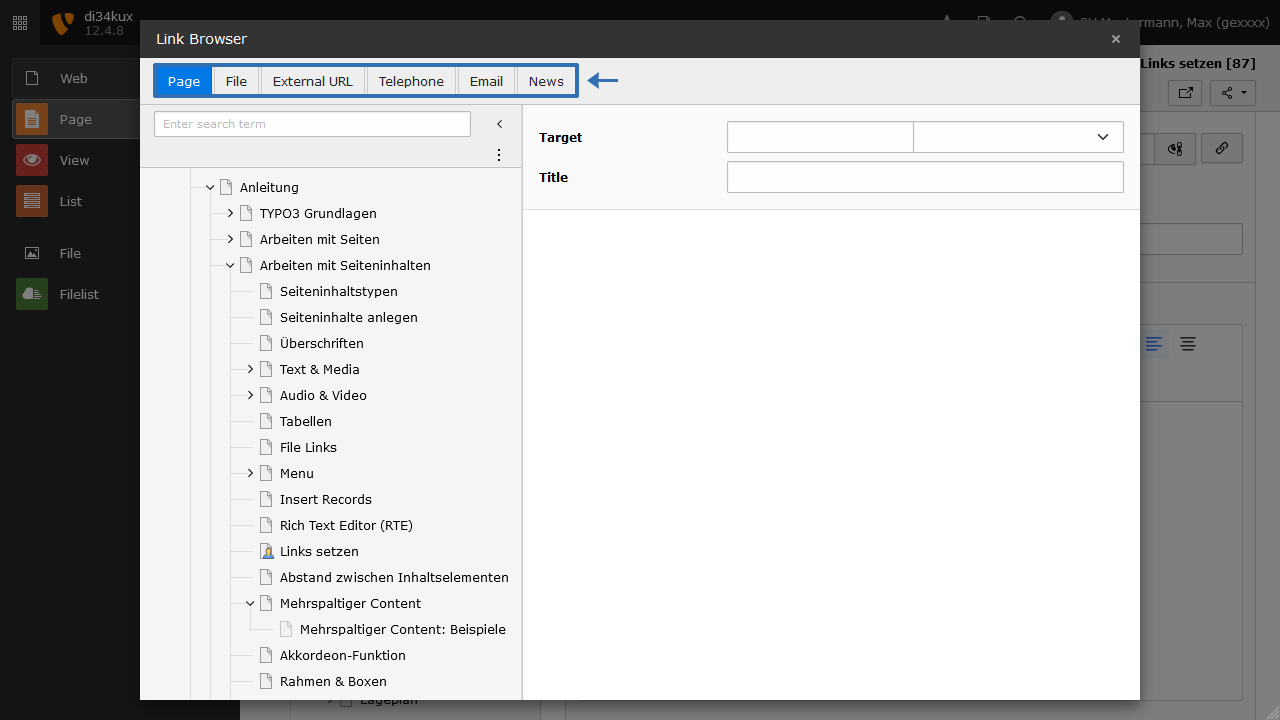
Linking images

Screenshot: Linking images
Image 4: Linking images
  • Click on the icon to the right of the link field (Image 4).
  • The Link browser opens, where you can enter the link address.

Option "no-hint"

Screenshot: css-class: no-hint
Image 5: css-class: no-hint
Screenshot: Image with/without arrow
Bild 6: Image with/without arrow

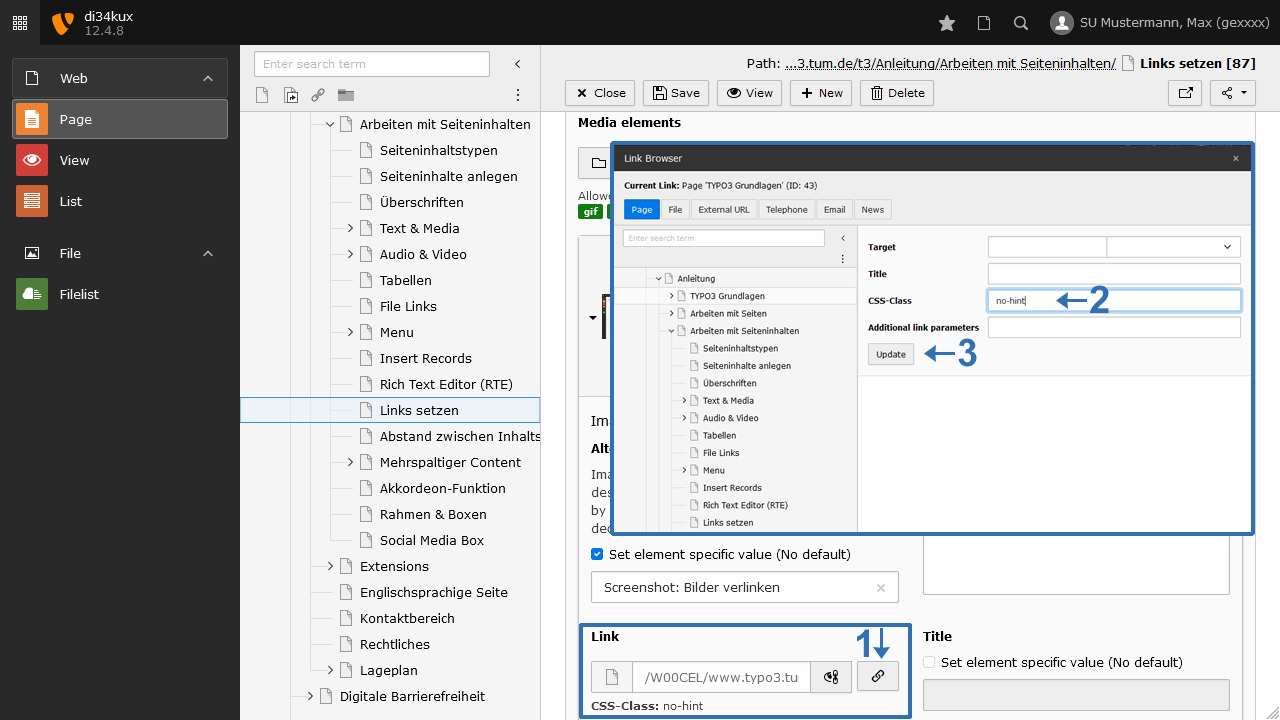
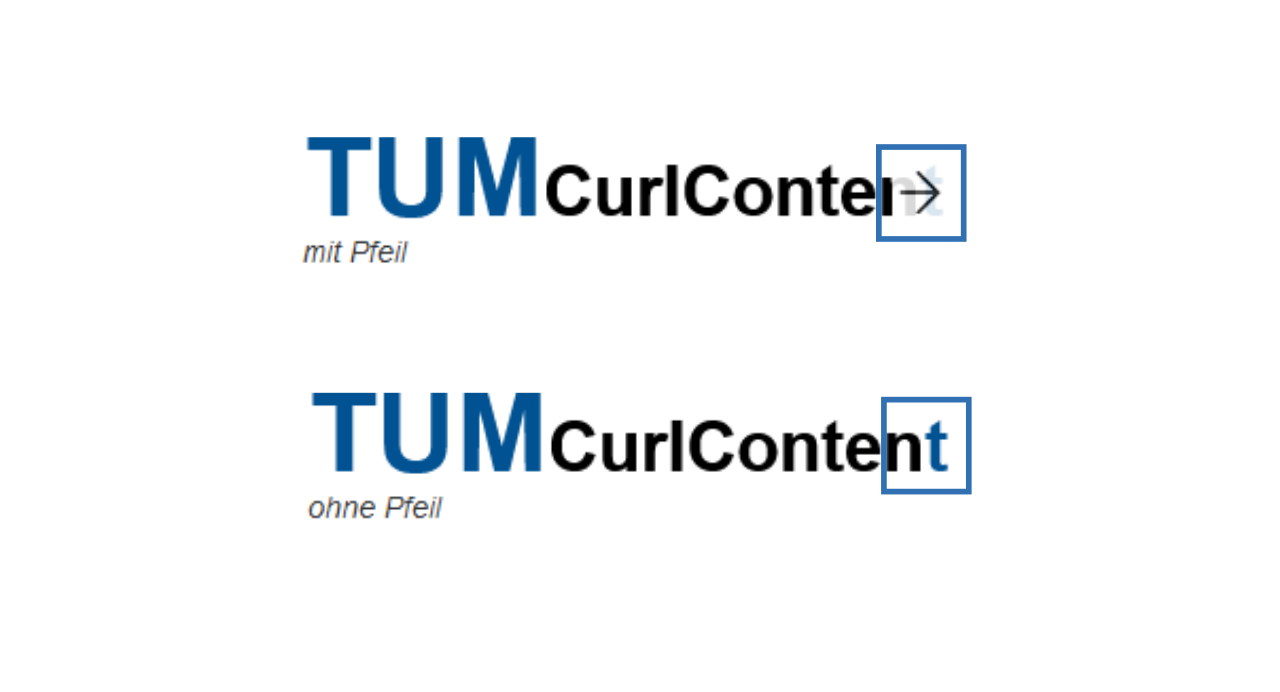
Images with a link are displayed with a small arrow icon. In some cases, such as logos or icons, these arrows can be distracting. You can disable the arrow:

  • Enter "no-hint" (without quotes) in the CSS-Class field of the Link browser (Image 5, No. 2) and click the Update button.

Link to an internal page or directly to a content element

Screenshot: Internal Link
Image 8: Internal Link

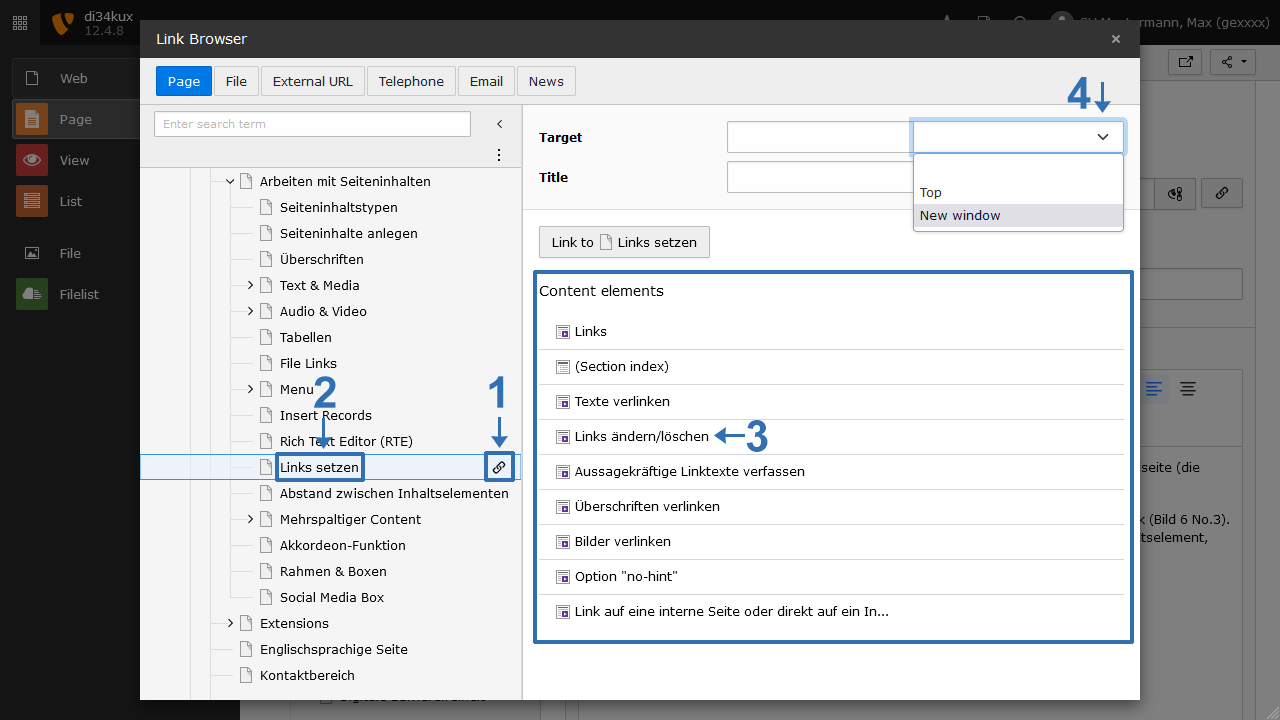
For a link to a page within your website:  

  • In the Link Browser, under the Page tab, you can see the navigation structure of your site.
  • Select the target page (Image 8, No. 2) and click on the chain symbol next to the page title (Image 8, No. 1).  

To link directly to a content element:  

  • Click on the page title (Image 8, No. 2). The content elements of this page will be listed in the right column.  
  • Click on the desired content element (Image 8, No. 3) to generate the link.

Additional Options:

  • The link will open in the same window if you leave the field (Image 8, No. 4) blank or select "Top".
  • If you select "New window", the page will open in a new window or tab (Image 8, No. 4).

Link to a specific section ("anchor")

Anchor links allow you to link to a specific section on the same page or on a different page. This is particularly helpful on long pages, where users can jump directly to a specific section.

You create an anchor link using the text editor (Rich Text Editor):

  1. Open a content element.
  2. Click into the text section that should be linked.
  3. Click “Set anchor” (bookmark icon).
  4. Enter a meaningful and unique (for the page) anchor name and confirm by clicking the green checkmark.

How to link to the anchor:
The anchor link consists of the target page plus a hash symbol and the anchor name you defined:
www.xy.tum.de/shortcut/target-page#anchor-name

More detailed guide on managing anchor links


Link to an internal file

Screenshot: Link an Internal File
Image 9: Link an Internal File

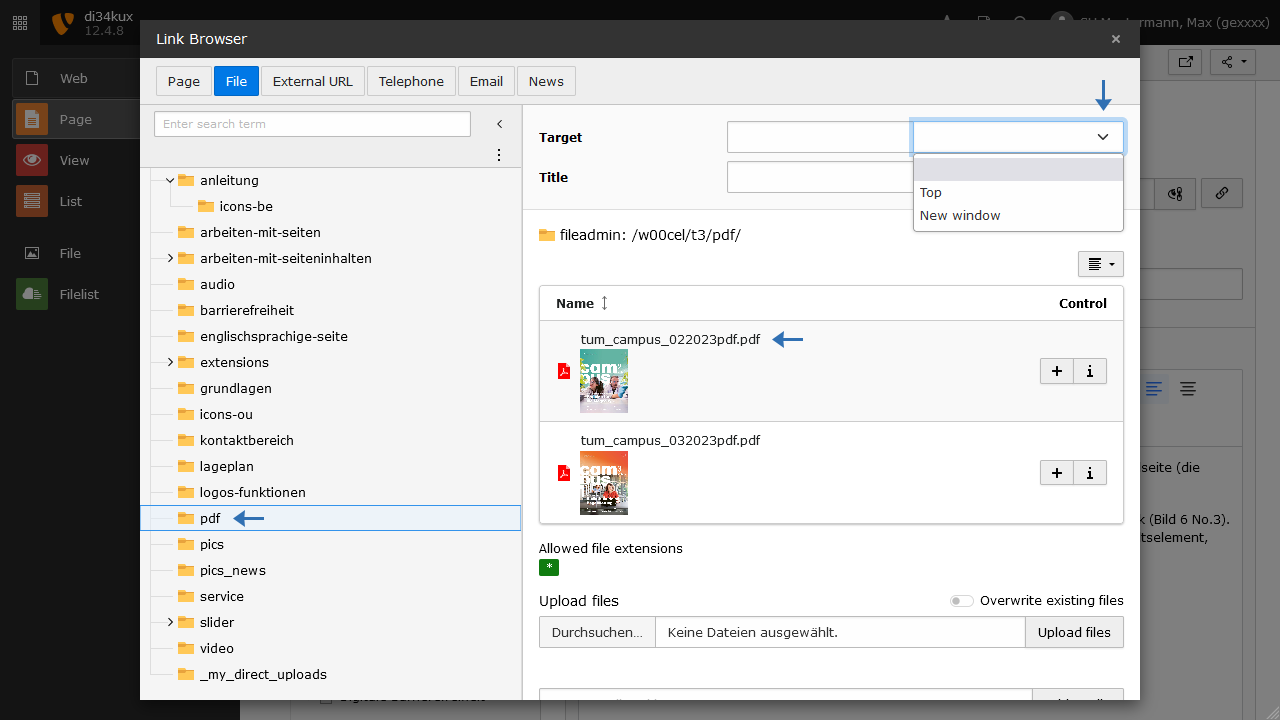
In the Link browser, under the File tab, you can select a file (e.g., PDF) from your filelist:

  • Click the relevant folder, then click the desired file.
  • Instead of linking a text section to a file, you can use the File Links content element, which provides different styling options.

Link to external websites

Screenshot: Link external URL
Image 10: Link external URL
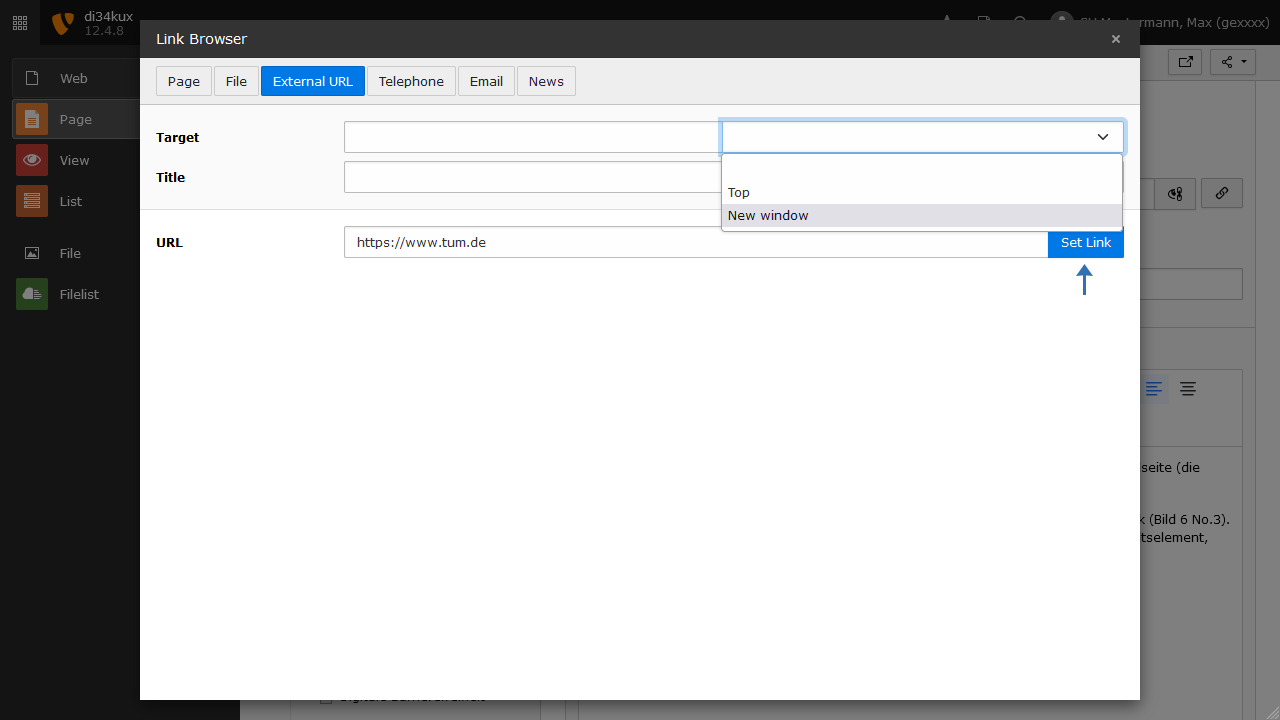
  • Switch to the “External URL” tab in the Link Browser.
  • Enter the complete URL (including "https://") in the corresponding field and then click “Set Link”.
  • The link will open in the same window if you leave the field blank or select "Top".
  • If you select "New window", the page will open in a new window or tab.

Link to an email address

Screenshot: Link an email address
Image 11: Link an email address

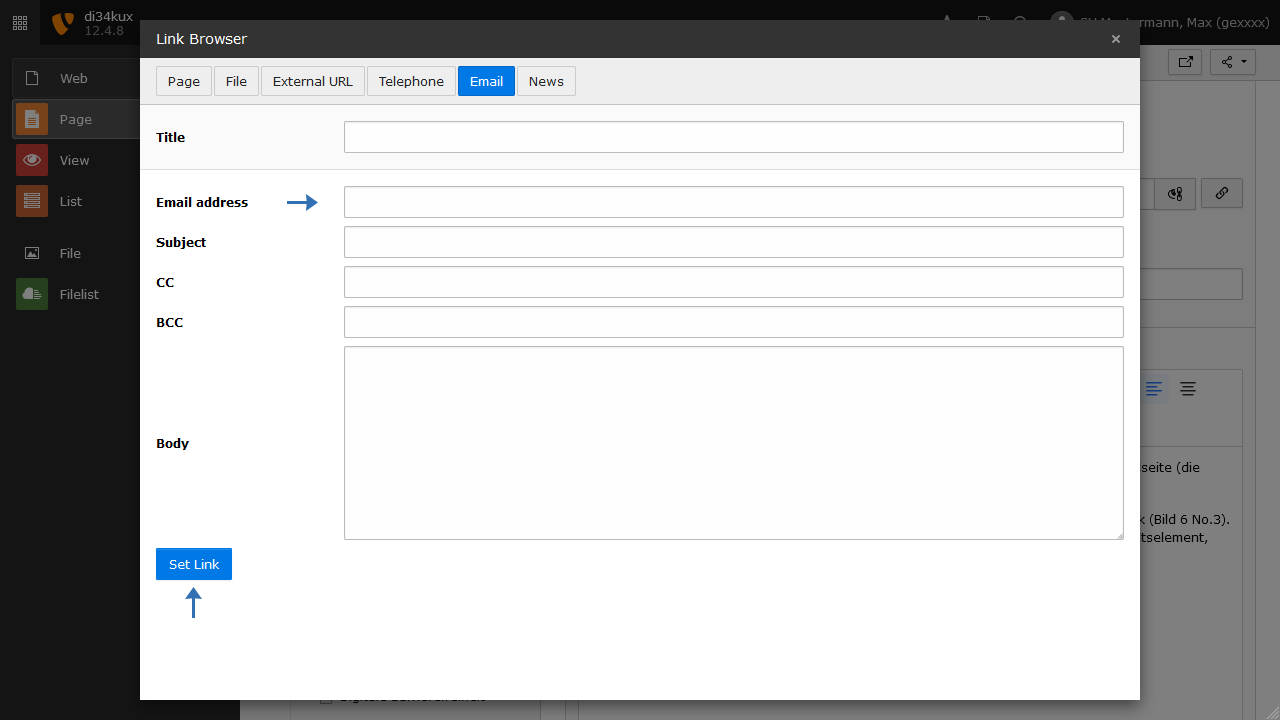
To link an email address, click on the “Email” tab in the link browser:

  • Enter the desired email address in the Email Address field and confirm by clicking “Set Link”.
  • Optionally, you can fill in the additional fields.
  • You can also add an icon to the email address (Image 12, No. 4). 

Link to a password-protected area

Screenshot: Locked URL
Image 12: Locked URL

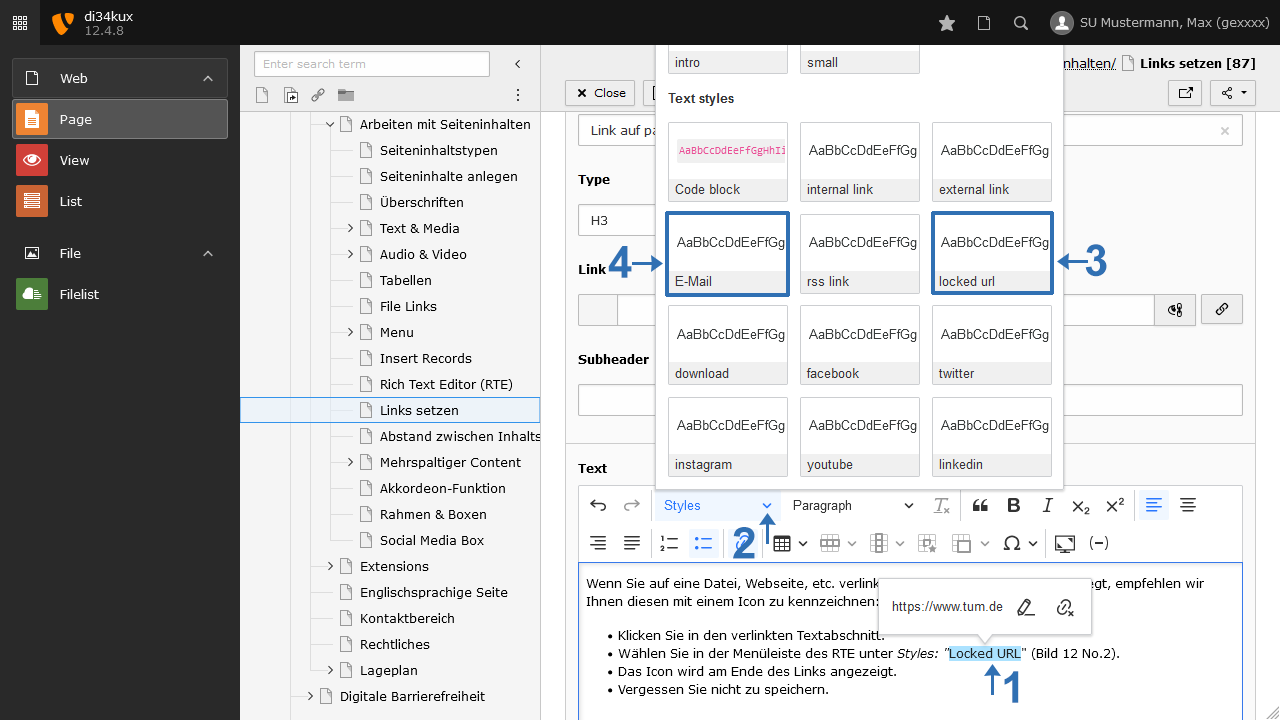
If you are linking to a file, webpage, etc., that has password protection, we recommend marking it with the "Locked URL" icon: 

  • Click on the linked text section (Image 12, No. 1).
  • Select “Locked URL” (Image 12, No. 3) from the "Style"s" menu in the RTE.
  • The link will be marked with an icon.  
  • Don't forget to save.

Changing/deleting links

Screenshot: Edit/Delete links
Image 7: Edit/Delete links

To edit an existing link:  

  • Place the cursor in the linked text.
  • Click on the “Edit Link” icon (Image 7, No. 2).
  • Use the “Unlink” icon to delete an existing link (Image 7, No. 3).
To top

TYPO3 News

14.04.2026

TUMFIS is now available (Open Beta)

23.03.2026

Structured Data and JSON‑LD available

25.02.2026

New functions: Image cropping and Anchor links

21.01.2026

New Security Concept - User Accounts

01.08.2025

We are in OTRS!

RSS Feed

TUM TYPO3 (ZIT)

Richard-Wagner-Str. 18
80333 München
typo3@tum.de

  • Privacy
  • Imprint
  • Accessibility