Text & Media
The "Text & Media" element is the most commonly used content element and serves as a versatile tool for designing your website. In the "Text & Media" content element, you can incorporate not only text but also images, audio files, or videos into your page.
Prepare images for the website
Images must be prepared before uploading them to the website:
- Do not upload images directly from the camera to the website or the website's file system.
- Edit the images in advance using image editing software (e.g., Photoshop):
- Change the file names.
- Reduce the image size to the dimensions in which they will be displayed on the website.
- Use only image file formats such as jpg/jpeg, gif, png, svg, or webp.
- Ensure that images have the same width and height if they are to be inserted into the same content element before uploading them to the website's file list.
- For layouts with a right column, the maximum width for images is 936 pixels; for layouts without a right column, the maximum width is 1176 pixels.
Create content element "Text&Media"
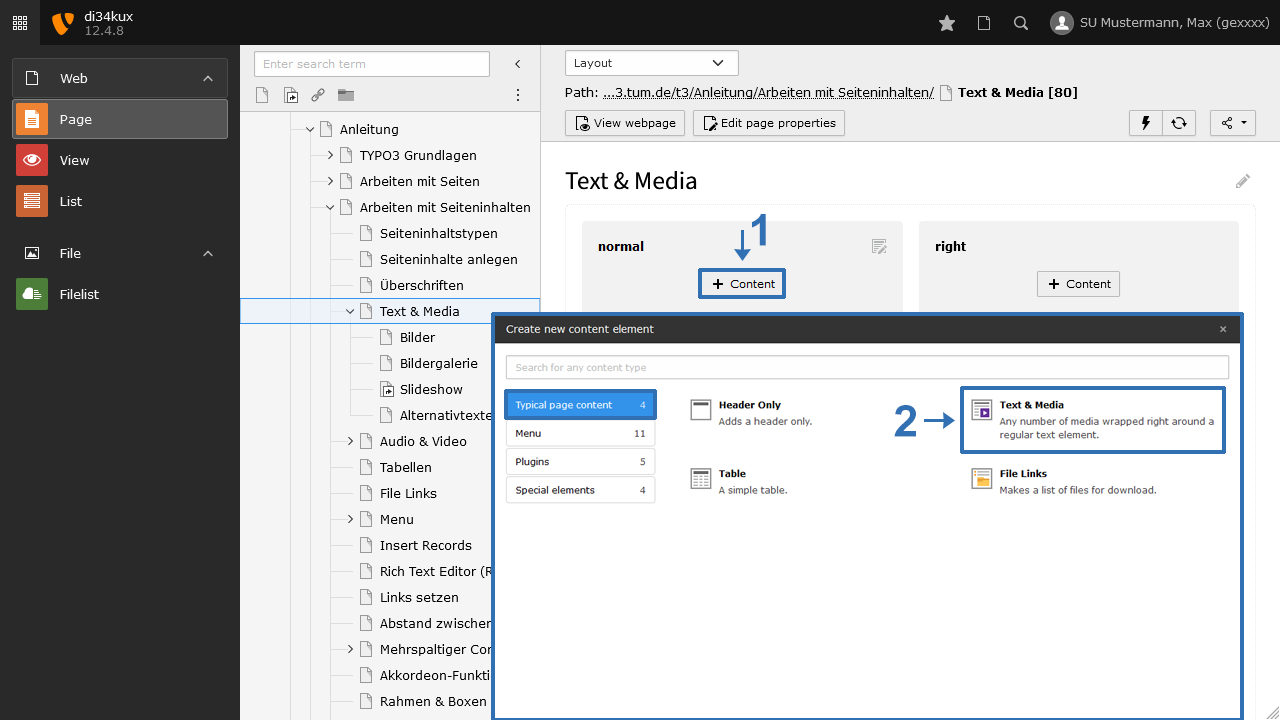
To insert media elements (images, video, audio) into a content element, select “Text & Media”.
Overview "Media" tab
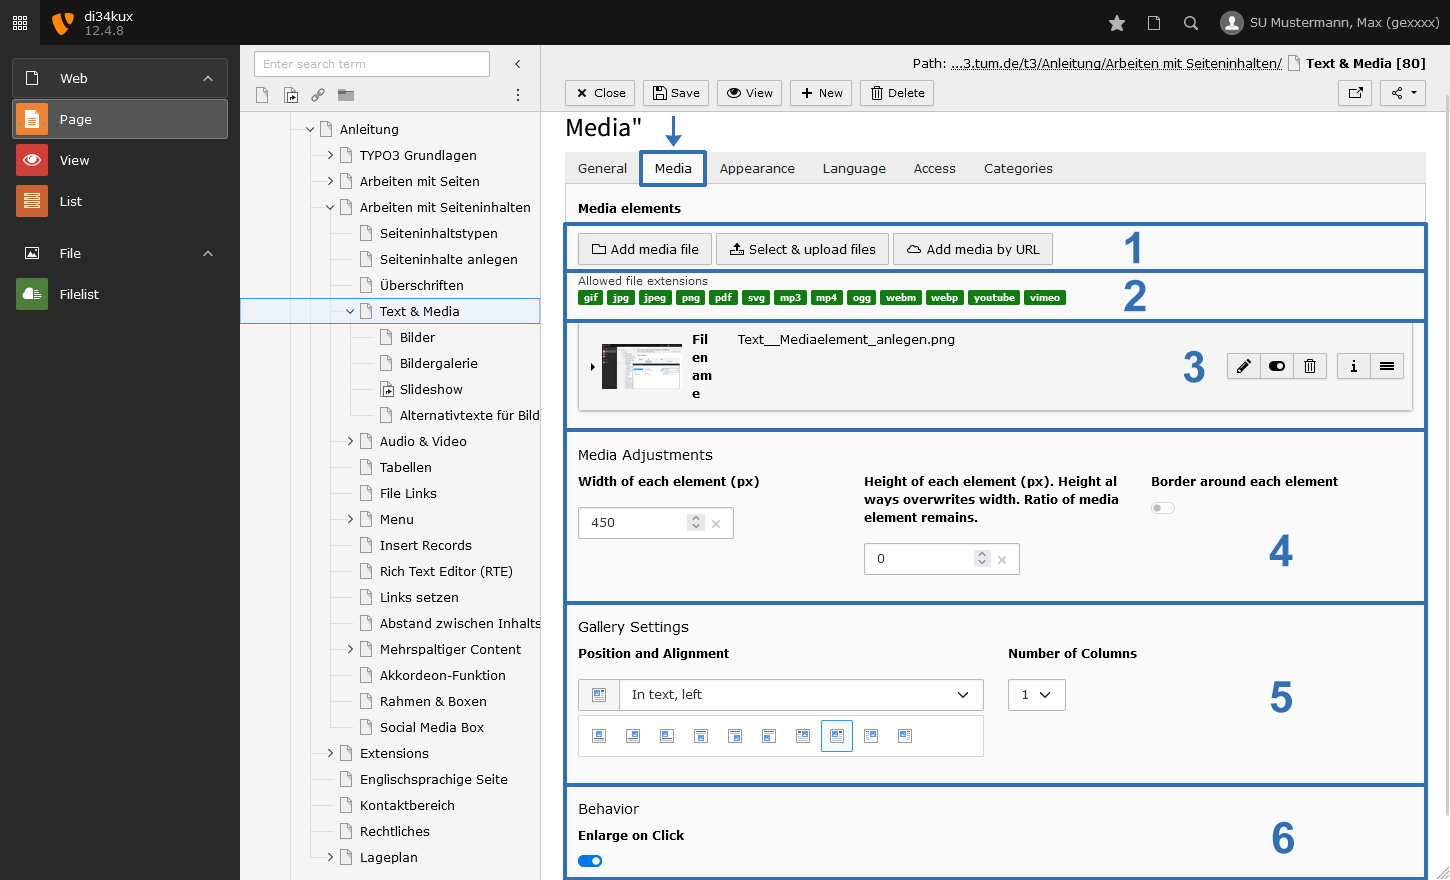
- Media elements can be embedded from the file list (Add media file), from your computer (Select & upload files), or through YouTube/Vimeo videos via a URL (Add media by URL).
- File formats that can be integrated with text & media are supported.
- Media elements that you have already added to your content element will be listed here. You can edit, deactivate, or delete each media element.
- Specify the size of the media elements. The settings apply to the entire content element, and it is not possible to set different size specifications for individual media elements. You can also leave these fields empty - this way, the width/height of the media elements will be determined by the template.
- Set the text flow: How the media elements are positioned in relation to the text. This setting applies to the entire content element.
- Enable the "Enlarge on Click" feature.
Embedding media in a content element
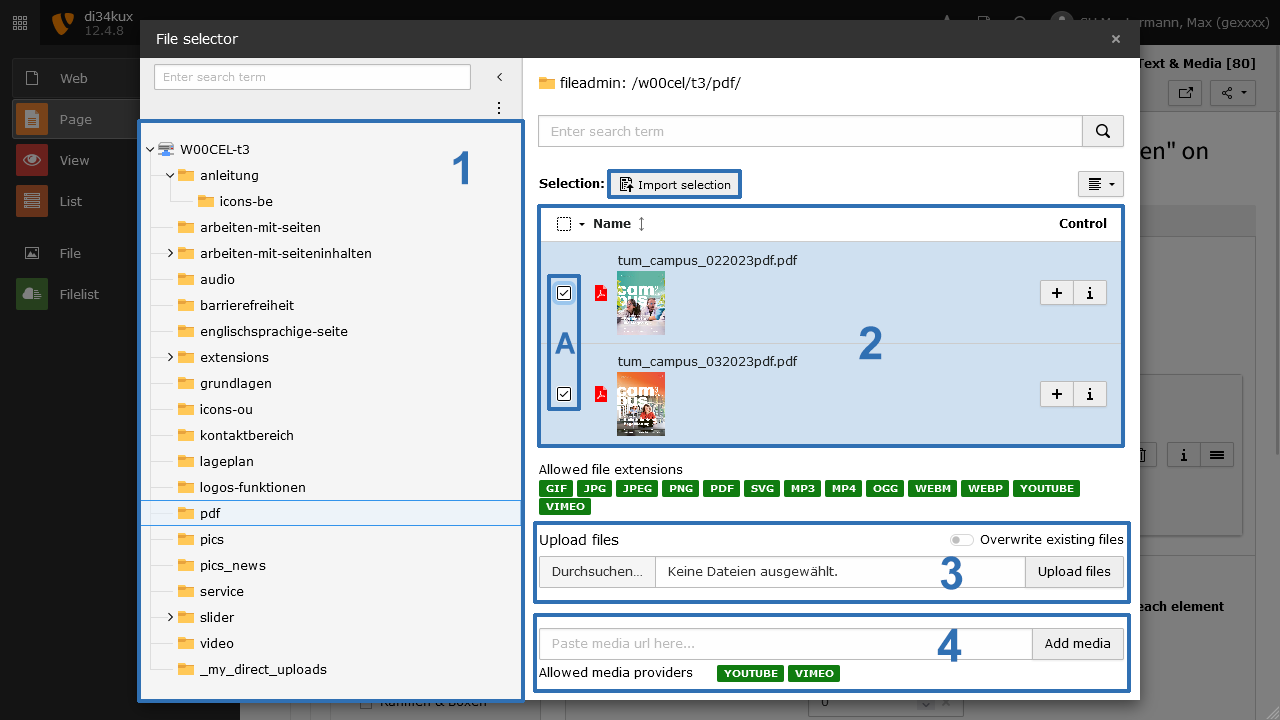
Click on the Media tab and select Add media file (Image 2 No.1). The file list will open in a pop-up window (Image 3). You can now add one or more media elements to the content element:
- Tree structure of the file list. Save your files in folders and subfolders, and create a sensible structure here. With too many files in one folder, it's easy to lose track.
- List of files in the selected folder. You can select these files and add them to your content element. To do this, click on the desired file or check the box for multiple desired files (Image 3 No.2A) and confirm your selection (Image 3 No.2B).
- If a file has not yet been uploaded to the file list: Click on "Browse..." (Image 3 No.3) and select the desired files from your computer's directory. Confirm your selection with "Upload files" (Image 3 No.3), and the files will be uploaded to the displayed directory of the file list. After that, you can proceed as described in point 2.
- You can add a link to a video (YouTube or Vimeo) to the file list. To do this, enter the URL of your video in the field and click on "Add media." You can work with this link, as described in point 2. There is a separate guide for working with video elements.
Change the order of elements
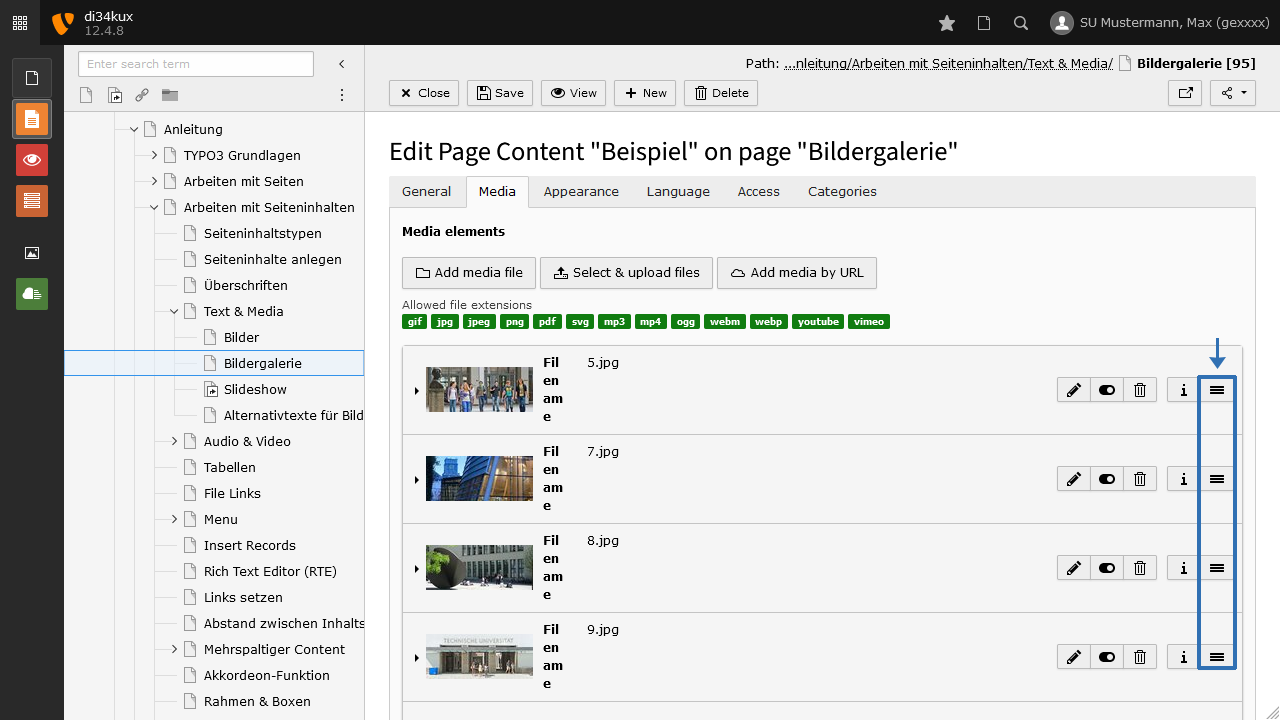
The order of the media elements can be changed by drag & drop:
- Click and hold the "move" icon (Image 4) and drag the image to the desired position.
Metadata (image metadata)
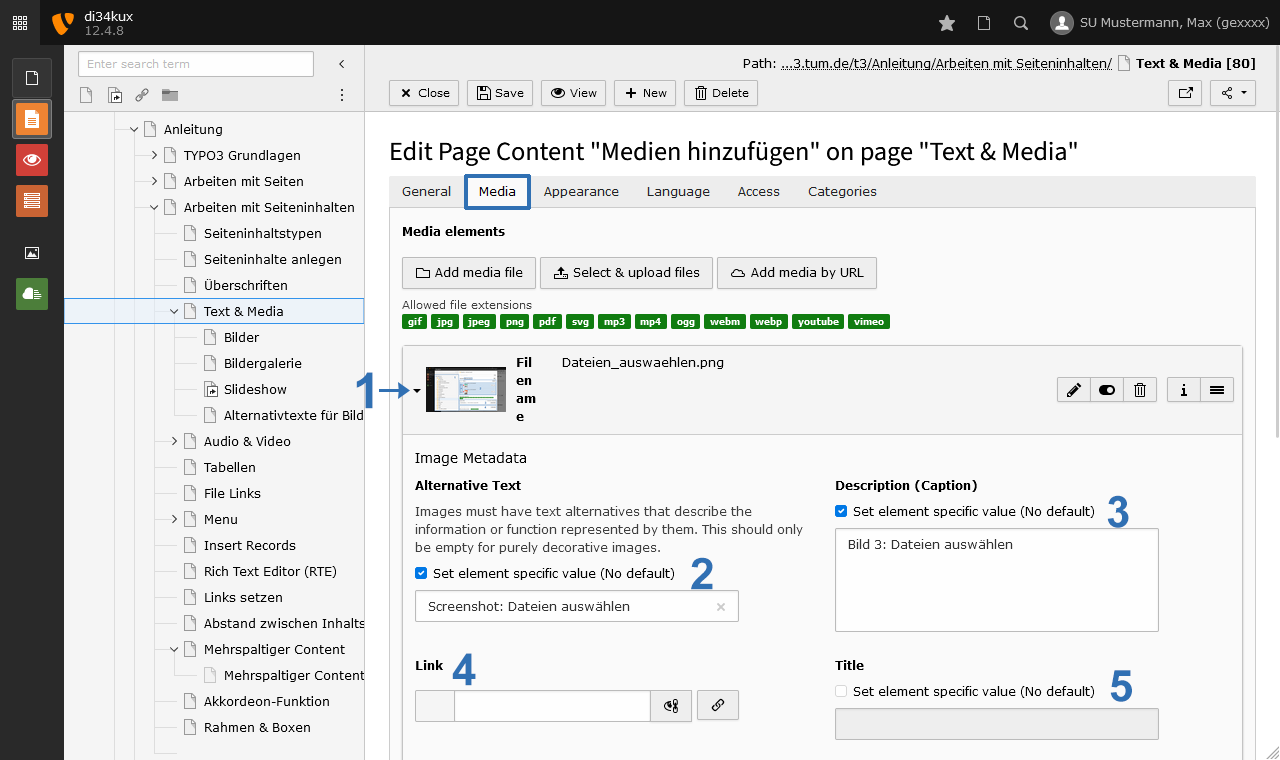
The fields for the metadata will be visible as soon as you click on the image (Image 5 No.1).
If you have already created metadata through the file list in the document, it will be automatically imported. You can also change/overwrite this for the specific content element by clicking the corresponding checkbox "Set element specific value (No default)." This will activate the fields, allowing you to fill them with new content.
Alternative text
The field "Alternative Text" (Image 5 No.2) is a mandatory requirement in terms of accessibility. Users of screen readers are unable to view an image. The only way to learn about the content of the image is through the alternative text, which is read aloud by the screen reader. Often, the meaning of an image is described in just a few words.
For more information on how to formulate alternative text, please refer to the section on writing alternative texts for images and graphics.
Caption
In the Description (Caption) field (Image 5 No. 3), you can enter a brief and meaningful caption for the image. Unlike the alternative text, this text is visible and displayed below the image. The caption should differ from the alternative text. Here, you can include information such as the name of the person or place depicted, or details about the copyright holder.
Link
You also have the option to link media (images or PDFs). To do this, enter the URL in the Link field (Image 5 No. 4). If you link an image, please add the alt text with the link's destination. For more information, see the section "The Image is a Link."
Please note that you cannot activate the "Enlarge on Click" function and set a link at the same time.
Title
Leave the Title field (Image 5 No. 5) blank.
Browser support for the title attribute is so inconsistent that even the HTML standard advises against its use: HTML Living Standard, 3.2.6.1 The title attribute.
Don't Rely on the Title Attribute for Accessibility (engl)
Additionally, the title attribute is not relevant for search engine optimization (SEO).
More options
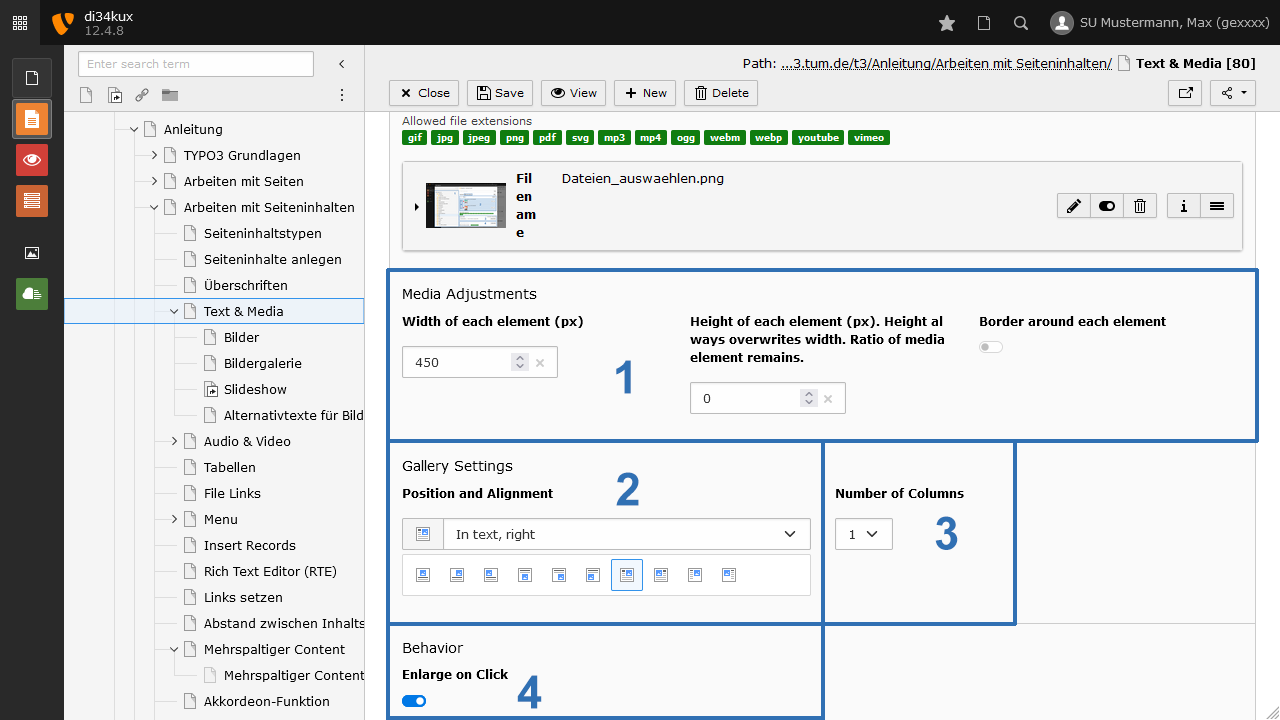
- Please enter either the width or height (Image 6 No.1). Please only enter one of the two values!
- Choose the text flow: What is the position of the media elements in relation to the text (Image 6 No.2).
- Number of Columns (Image 6 No.3):
- If multiple images are to be displayed vertically, select Number of Columns=1.
- If you would like to place multiple images side by side, choose the desired number of columns (maximum of 9).
- Enlarge on Click (Image 6 No.4): This feature is only available for images. For more information, please refer to the description of the image gallery function.
Note on recommended and maximum image size
The maximum width for images in the main column is 1176 pixels for a two-column layout (without the right column) and 936 pixels for a three-column layout. The maximum width for images in the enlarge-on-click feature is 1280 pixels.
For arrangements of images next to text or in multiple columns side by side, these dimensions are reduced accordingly. This also applies when you specify the width or height directly in the media settings.
If the uploaded image file is larger than what is used in the output, TYPO3 will create a scaled copy of the image. The quality of the image may be degraded by this scaling process. The larger the scaling step, the more noticeably the image quality worsens. Therefore, you should scale images on your computer using an appropriate image editing program before uploading them, so that TYPO3 can use your file directly. This is especially important for photos taken from a digital camera and when you want to maintain the original format (as GIF or PNG files will otherwise be output as JPEG).